Binance KYC Failed? Photo, Name, ID and Liveness Fixes
When Binance KYC is rejected, the cause usually falls into one of six groups: the photo doesn't meet the requirements, the details you entered don't match the document, the document is expired or not accepted, the liveness check fails, your region isn't served, or you're under the minimum age. Each is covered below: how to tell, and what to change.
After a rejection, don't resubmit straight away — check it against the causes below first. Resubmitting again and again can trip risk controls and push your review further back.
Cause 1: document photo blurry / glare / corner cut off
This is the most common cause. The system's requirements for the document photo are far stricter than you'd think: all four corners in frame, the text clear and legible, no glare, and no obstruction whatsoever. The common slip-ups:
- Using an old gallery photo or screenshot. Many systems can tell this wasn't shot live and reject it outright. Just play it straight and shoot live with the capture screen it gives you, instead of pulling from your gallery to save effort.
- Shooting on a glass surface or under harsh light, all glare. Glare on the document's surface washes out the key details. Move to a spot with even, soft light, don't use the flash, and don't shoot in direct midday light by a window.
- Blurry, or too far away. A shaky hand, focus that didn't lock, or being too far so the text is tiny — the system can't read any of it. Lay the document flat, hold the phone steady, fill the viewfinder with it, then press the shutter.
- Document in a card sleeve, or a finger over a corner. Take the clear sleeve off before shooting, keep fingers off the document's edges, and show all four corners.
The fix is straightforward: find an indoor spot with even light and a flat, dark background, lay the document flat, use the app's built-in capture, and take one clear, complete shot each of the front and back. Zoom in and check it yourself afterward — can you read the text, are all four corners there — and only submit once you're sure it's fine.
Cause 2: name or info doesn't match the document
During verification you have to type in your personal information by hand — name, nationality, date of birth and so on. The moment what you entered doesn't match what's printed on the document, even by a single character or spelling, the system rejects it. This category is especially sneaky, because the photo itself may have come out great, so you assume it's a photo problem when actually the info isn't aligned.
The spots most likely to go wrong:
- Name spellings entered in the wrong order. The order of surname and given name on a passport gets reversed by people out of habit, and the system can't verify it. Copy it exactly as it appears on the document.
- A middle name missing or added. If you have a middle name, keep it consistent with the document — don't take it upon yourself to drop or add one.
- One wrong digit in the date of birth, or month and day swapped. This small slip is common; check it digit by digit.
- Using a former name / alias. You have to enter the name currently in effect on the document.
A lot of people see "failed" and reflexively re-shoot the photo, only to end up with better and better photos that still don't pass — because it was never a photo problem. After it's bounced, go back to the "basic info" field first and check your name, date of birth and document number against the document character by character, digit by digit, fix it, then submit. This is the highest-value troubleshooting step there is.
Cause 3: document expired or not accepted
This one gets overlooked, but it's firm: the system won't take an expired document. ID cards and passports all have an expiry date, so before you dig one out to use, glance at the expiry first — if it's lapsed, go renew it; there's no shortcut. A few related situations:
- The document type isn't accepted. Which document types are supported varies by region; a temporary ID, a photocopy or a scanned copy may not be accepted. Go with an official original first — say a valid ID card or passport original.
- The document is about to expire. Some systems are stricter with documents close to expiry, too. If yours runs out in a few months, it's better to just use the more recent one.
- The document is damaged or worn. Wear, creases or stains covering the text where the key details are will hurt recognition — switch to a document in good condition.
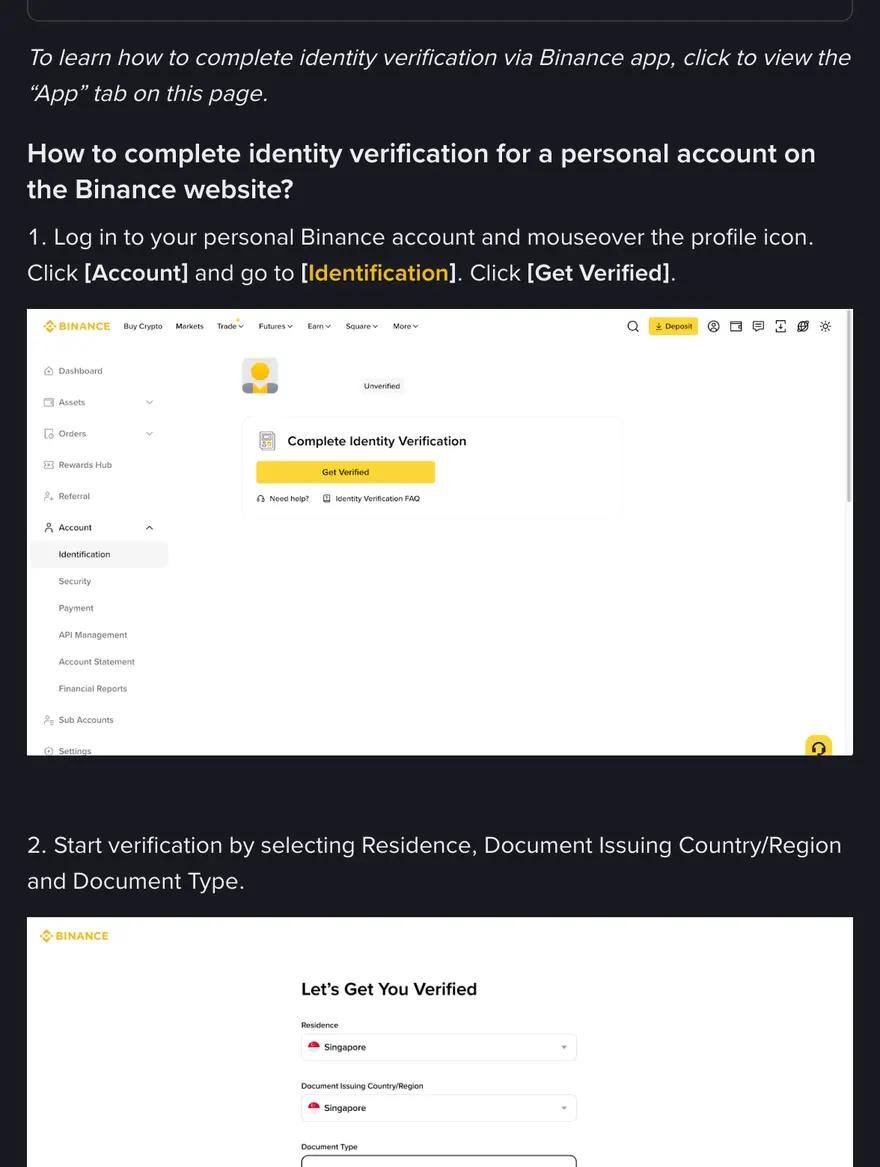
Binance has step-by-step notes on which documents and which regions map to which verification tiers, and they get updated. The safest move is to search "identity verification" in the Binance Help Center to see which documents your region currently accepts, treating what the official pages show in real time as the source of truth.
Cause 4: liveness check keeps failing
The liveness check (facial recognition) has you face the camera and blink, turn your head or read out numbers as prompted, to prove the person holding the document is really you. When it keeps failing, the vast majority of the time it's an environment and handling problem, not a problem with your face:
- Light too dim or backlit. With a window or strong light source behind you, your face goes completely dark and the system can't see it. Move to a spot with even light facing you, and don't have the light coming from behind.
- Something obstructing. Glasses, a hat, a mask, or a fringe covering your face will all cause it to fail. Remove every obstruction as prompted.
- Movements lagging / a laggy connection. The liveness check relies on a live video stream, so a flaky connection cuts the feed. Confirm your connection is stable first, then go slower and move at its pace — don't rush ahead.
- A dirty front camera. This is the easiest to overlook — the phone's front lens has a film of grease or dust and the image goes blurry. Wipe the lens with a cloth first.
Also, I'd strongly recommend doing the liveness check on your phone; a phone's front camera usually has a much better experience and success rate than a computer's webcam. If it keeps failing on a computer, switch to the phone app and retry — it often passes first try.
Cause 5: your region isn't served
This cause and the next aren't problems with your documents but rule-level restrictions, and re-shooting a photo won't solve them.
Crypto exchanges have compliance requirements about where an account is registered and used, and some countries and regions are restricted from service. If you get blocked outright at the sign-up or verification stage with a "service unavailable" message or similar, you likely fall into this category. This is the platform's compliance line, not a technical glitch. Which regions are restricted and how the rules work is for Binance's official statements for your region to define. Please make sure you follow the laws and regulations where you live — this site is education only and offers no method or advice for getting around compliance or region restrictions.
Cause 6: under the minimum age
Legitimate platforms generally require the account holder to be of legal age (usually an adult). If you're below the platform's minimum age, verification won't pass — there's no workaround, and there shouldn't be.
When verification stalls, scammers love to slip in. They'll message you posing as "Binance support," claiming they can "speed up your verification" or "manually unblock it," and try to get you to send over your document photos, facial-recognition video, even a verification code — all of it to steal your account and your identity. Keep this firmly in mind: official verification happens entirely inside the Binance app or website, and real support won't reach out to you privately or ask you for your password or a verification code. If you hit a problem, only use the ticket channel in the official Help Center, and don't trust any "insider fast-track" in a private message. For more of these schemes, see the scam-avoidance guide at the end.
What to do if you really can't pin it down
If you've checked all six categories and it still won't pass, don't keep blindly resubmitting. Try this: go through each item above thoroughly (photo, info, document validity, liveness environment, region and age), and once you're sure they're all fine, wait a little while, switch to a clean, stable connection, and run through the flow again on your phone. According to the Binance Help Center, submitted documents are usually reviewed within 48 hours, though special cases can take longer; if there's still no result after that, submit an official ticket in the Binance Help Center, describe your situation clearly, and let the team tell you exactly where it's stuck. The whole of KYC is a platform compliance requirement; for a thorough look at why it exists and how it generally goes, you can read Investopedia's explanation of Know Your Client (KYC).
Sign up with our invite code BN666X for up to 20% off trading fees*
* Actual rate shown on Binance's promo page, subject to change. CoinFledge is an independent guide, not affiliated with Binance.
Once you're verified, set up 2FA and an anti-phishing code before you deposit.